Converting VirtualBox VM to a Xen Hypervisor Virtual Machine

VirtualBox is one of the easiest virtualization platforms in use today. With graphical user interface, cross-platform support, and comprehensive documentation online, it is also one of the most obvious choices for a developer. So how do you scale this virtual machine from your workstation to a development server?
The process is relative straightforward and involves simple steps:
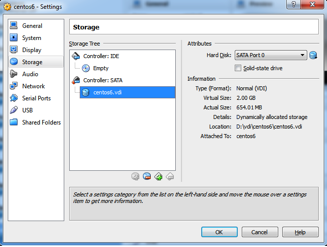
Step 1: Locate the VDI file’s location from Virtual Machine’s setting in VirtualBox. In our example, the VM is CentOS 6.3, disk image name is centos6.vdi and it uses 654 MB of space. The Virtual Size is the amount of space this disk image will use when converted to RAW format:
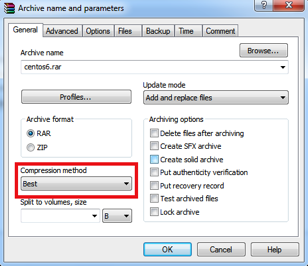
Step 2: Compress the .vdi file of your VM with WinRAR using “Best” Compression method. This reduced our VDI file from 654 MB to 158 MB RAR archive:
Step 3: Upload the archived disk image (centos6.rar) to your Xen server via SFTP / SCP, and extract centos6.vdi to your Xen image folder (e.g. /var/lib/xen/images/ ). You might have to install unrar for your distribution of Linux or download directly from RarLab:
# wget http://rarlab.com/rar/rarlinux-x64-4.2.0.tar.gz && tar xvfz rarlinux-x64-4.2.0.tar.gz
# cp rar/unrar /usr/bin/
# cd /var/lib/xen/images && unrar e centos6.rar
Extracting  centos6.vdi                                               OK
All OK
Step 4: Download and install VirtualBox on the Xen server. This may seem a bit redundant, but we are really just interested in VBoxManage tool supplied with it. On CentOS hypervisor, install the necessary libraries and download VirtualBox 4.2 or whichever is latest:
# yum -y install qt libXmu && rpm -ivh http://download.virtualbox.org/virtualbox/4.2.4/VirtualBox-4.2-4.2.4_81684_el6-1.x86_64.rpm
This should give you VBoxManage utility:
# ls -l /usr/lib/virtualbox/VBoxManage
-rwxr-xr-x 1 root root 758384 Oct 26 12:17 /usr/lib/virtualbox/VBoxManage
Now you can convert your VDI disk image to a RAW disk image that you will use for Xen VM:
# cd /var/lib/xen/images
# /usr/lib/virtualbox/VBoxManage clonehd centos6.vdi centos6.img -format RAW

0%...10%...20%...30%...40%...50%...60%...70%...80%...90%...100%

Clone hard disk created in format 'RAW'. UUID: f220932f-8750-4f5b-b220-8050210e9835
Step 5: Refer to the centos6.vbox file, and create the configuration file for Xen VM. You can do this manually or create a shell script that would extract the necessary fields and parse them into Xen configuration file.
For our example, we have already configured a virtual bridge on Xen hypervisor and will be using this configuration to spin up the VM:
# cat /etc/xen/centos6
name = "centos6"
uuid = "f220932f-8750-4f5b-b220-8050210e9835"
memory = 1024
vcpus = 1
bootloader = "/usr/bin/pygrub"
on_poweroff = "destroy"
on_reboot = "restart"
on_crash = "restart"
disk = [ "file:/var/lib/xen/images/centos6.img,xvda,w" ]
vif = [ "mac=00:16:3e:46:e6:fb,bridge=xenbr0" ]
extra="console=hvc0"
Step 6: Create your Xen VM using the configuration file and the RAW image:
# cd /etc/xen/
# xm create centos6
Using config file "./centos6".

Started domain centos6 (id=16)
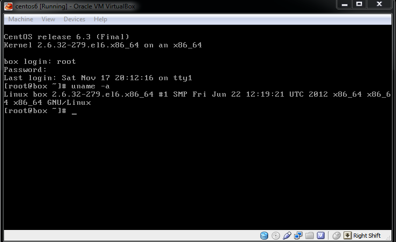
Step 7: Verify that everything is working as expected:

The virtual machine is up and running on a Xen hypervisor. This simplifies the entire process, as you can develop your entire virtual machine on your workstation, and have it up and running on a production hypervisor without having to migrate individual services manually.